Showing posts with label Tricks. Show all posts

Thursday, 19 January 2012

“What Do You Love” New Google Search Service

WDYL” short of What Do You Love is another service by Google which has combined everything into one package, so it lets you search for anything and displays results from all Google Services @ one place.
What Do You Love Google Service
So when you will visit WDYL, you will be presented by the above  screen here you can put any query and you will be greeted with great results from all over the Google Services. From there you can navigate to any of their pages and get good quality information on that thing. So I just made a search on “Tricks” and I got something like below results.

What Do You Love Google Service What Do You Love Google Service
So now visit What Do You Love website now and give it a try you will be impressed by the speeds and quality of the results. Have Fun :) and I would like to say Google Rocks.

Wednesday, 18 January 2012

Fake Call Your Friends Using Any Mobile Number


Crazy CallPeople usually try to bring something new and try them on their friends so that they can impress them and side by side depress them with their funny pranks. So pranking has become a latest fashion in todays world so some people prank physically and some mentally so we have already posted many articles on different pranking methods you can use to depress or make fun of your friends.


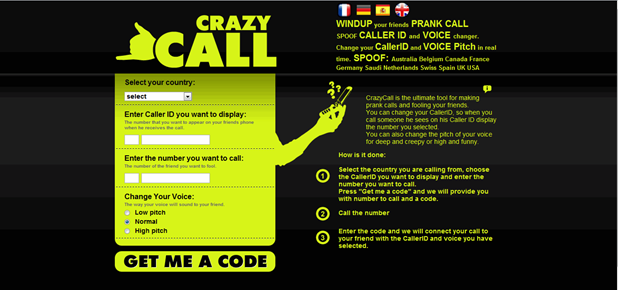
Today we are taking it to a new level by revealing you another amazing online fake calling service called “CrazyCall”. This service is simply unbelievable and works quit perfect, so there is no point of saying that this service is useless as I have tried it and it works perfect. Some of you might have used it but some of you don’t know what is Crazy Call, so okay for all those who do not know what is Crazy Call it’s a simple online service which connects your call through their server to anyone you wanna talk in the world.
Crazy Call is not a free service as it charges with their international call prices but well if someone want to prank with you than some price cost is nothing to matter. So you should check steps below to see how Crazy Call works.

Follow below steps .:

2. Now you will be on their website which looks something like below .:
Crazy Call
3. Now you can see that theirs a Green Box above in the image asking you too choose country and than insert numbers you wanna display and make your call too, insert everything like below I have done in the image.
Crazy Call
4. Choose the country like I am in India and than the Number you wanna display like I have put 9191919191 you can put any number you wanna display and than put the number you wanna make your call too like 999xxxxxxx and choose in which voice you wanna make your call to, this is the best option and if you do not know about this thing this feature will simply manipulate your voice into female or harsh male really awesome.
5. Now click on GET ME A CODE and you will than navigate to their another page which will give you two numbers to call and a code which you have to enter when your call is connected.
Crazy Call
6. So now you can call any one of those numbers above, two numbers are given just in case you are not able to call with one number you can connect your call with another one and than when your call is connected the computer asks you to enter the code you see above just enter that and boom your call will be connected with your friend displaying him the fake number you entered.
7. So now enjoy this fake call and make your friends cry, tell them it’s a call from their college and they have been suspended for not attending lectures or anything you know better than me how to prank them make sure to read the below Warning.

Warning  ☠ ☠ ☠

The call costs you with International Prices, it works good but it costs like Rs. 15 for 1 Minute call, and from my experience I tried it out and the service was good there is no advertisement or anything but it charged me like Rs. 30 for 2 Minute so beware of it only use this service if you really want some serious prank else do not use this service.
Have Fun :) and Enjoy this Prank - Muhahaha !!!

Unlimited Free Facebook Access without Internet

 
Day by day many people are joining Facebook to connect with your family and friends who live far away from their home place, as Facebook is becoming the one social place for chatting, media sharing, commenting and distributing knowledge, its really important for every individual that he has access to his profile 24 hrs. where ever he is, with or without internet connection.
So getting popular day by day Facebook cannot loose its customer from anywhere so it has to bring some promotional tricks with which people will be engaged in using Facebook all the time. So to accomplish this thing Facebook has partnered with Fonetwish company to provide free Facebook access to all India users. So if you do not have Internet connection that also you can use Facebook with ease using your simple special message service.
So how it can be useful to you as you all have internet connection available but what if you have some phones coming from the old age and it does not support web browser or WI-Fi connection well you can access Facebook on that too so quit impressive hmm. So if you like it check steps below to see it in action.

Update :

A small subscription fees of ` 1.00 is charged for unlimited per day access.

1. Access the Service :

Now if you want to use this you have to dial *325# which is taken from *fbk# short for Facebook, so after you dial this number a message will be promoted displaying the company providing you this free access.
Fonetwish Facebook Access

2. Entering Username & Password :

After the message is promoted like above it will automatically be dismissed and you will another screen for entering your Username like above, now just enter your Username and than click Send or Reply in iPhone. After few seconds you will get another message to enter your Password for your Facebook account enter that password and you will have access to their free service.

3. Now Update your Statuses :

That’s it now every thing is configured and you will get some default commands which you can use to update your status and many other things on Facebook for free. So status updates in few seconds as it receives to the server.

4. Limitations :

This is like a promotional gift for all Indian Facebook users in collaboration with Fonetwish, well there’s no limitation on how status will be updated but limitation is that its currently available on Airtel, Aircel and Tata Docomo so other’s might get this service soon.

Sunday, 20 November 2011

Opera mini secret codes

Patrons of Opera mini browser will love this article, as they will get to know cute little productive secret codes which they can use in their opera mini. These secret codes are quite handy especially for those who do web browsing and would like to inspect site elements which would range from web page source code to management of browser stored cookies.

Opera mini is by far the most downloaded, most used and most loved mobile browser from among the league of different mobile phone based browsers. It availability for almost every other mobile phone operating system makes it the universal browser choice for everybody. Its pioneer efforts in compression of data, increasing of browsing speed, faster and easier loading of web page has already made it the favorite browser for majority of mobile internet users. Giving away secret hidden codes makes it quite an exciting not only for us i.e. technology enthusiasts but also for the regular opera mini browser user. These codes are to be used in the address bar of Opera Mini. Make sure that you delete http:// or http://www from the address bar before applying the following listed codes.

Codes:

opera:config / config:

If you are interested in knowing the configuration of your mobile phone browser, its capabilities and default settings then you can try the code config: in the address bar. The code will open up an internal page of opera mini called Opera Mini\\\\\\\'s Power User Settings page where you can tweak many browser settings like the timeout and whether the browser should make phone numbers click-able. This is quite handy as you might need to change the timeout wait time set by default.

server:source
Web developers will appreciate server:source which displays the source code of the current page. That way you can make out the entire html construction code of the site you are visiting. Its quite a handy tool when you have to view and edit your own sites html code setup.

opera:cache
Not exactly editable but it lets you know how much memory the cached content is chewing up in your mobile phone. This code can be your answer to your curiosity of opera mini slower loading. If the cached content is too much, you can always delete it and make the browser load faster.

about:
Most of us know that Opera Mini utilizes a proxy server technology to compress web pages for faster and better site loading. Opera Mini does this in order to minimize amount of data transfer and make the content load faster on the phone. Usage of this code allows display of information about the Opera Mini server.

debug:
It Displays a page listing many Opera mini server and client properties. The Host:[i] field tells you which Opera Mini server you are currently connected to. The known locations of servers are US, Poland, Iceland, Norway, South Africa etc. The server location is usually camouflages by an alphabetic notation. Servers between r02-12 are usually in the US. In certain cases the[i]r may be replaced with t,v,z etc.

feed:list
Opera mini is known to load feeds in a very mobile friendly format, using this secret code you will be able to conveniently navigate to the Feeds page

opera:about
This secret code displays copyright and license information for third party software used in the browser. Its not so much important but if you are only curious then there is no harm in simply trying it.

server:reset
A secret code of far more convenience. This clears all cookies stored in your locale thus safeguards you from being tracked by any analytics program.

server:refresh
You may not want to use this code as there is an easier way to reload the current browser page in opera mini, yet still, just for you can test this code and see if it refreshes the current page on your opera mini browser.

opera:blank  
Seeing blank page


The O code listings:
o:,
(Alphabetic O then : then ,) Opens the page To add a search engine to the list of already present

o:.
Usage of this code opens a blank screen showing two options i.e. Yes and No. Press Yes to search text in the web page (The Find in Page function).

o:/
Opens the page To add a search engine

o:!
Opens the page of To clear cookies
 
o:$
Shows the page Failed to connect to the internet

o:~
Shows blank screen with yes/no option.

o:d
Opens the page to Add a bookmark

o:h
Opens the page of About Opera

o:m
Opens the page of Search engines to manage (edit/delete/add)

o:A
Goes to the start page (Opera Mini 4.n only)

o:B 
Seeing menu on fullscreen

o:C  
seeing tool menu on fullscreen

o:I  
Go To Menu Setting

o:J  
Go To menu Help

o:L 
Go To list of shortcut 

o:V  
Go To History 

o:X 
Go To page About Opera (menu, ~tool, ~help, ~about) 

o:Y  
To bookmark this page 

o:Z
Goes to your bookmarks (Opera Mini 4.n only)

o:
Hangs Opera Mini, so do not try this one, at-least not on your own cell phone.

There are possibly more secret codes out there which one can use in their opera mini. I sincerely hope that there is none which would cause irreparable damage to the browser framework. If we are able to find more opera mini secret codes then we sure will post it here. Till then enjoy the above codes.

Wednesday, 9 November 2011

How To Find Bluetooth Address For Nokia S40 Mobiles

It's Very Simple to find Bluetooth address for Nokia Series 40 devices you have to just type the code *#BTA #, i.e. *#2820# enjoy.

How To Find Bluetooth / WLAN MAC Address For Nokia S60 Mobiles

Many Time I Confused While Some Wi-Fi connection Asking for Mobile WLAN MAC Addresses
 Finally I got A Beautifull Information For Nokia Phones..and Getting This Is Very Simple


Steps To Find MAC Address In Nokia.
 
  • It's Very Simple.WLAN device can be retrieved by the code *#MAC0WLAN# on the standby screen 
          (That is : Just Type On Home Screen *#62209526#)
  • To Retrieve Bluetooth MAC address.. Type *#2820#.

Monday, 31 October 2011

19 Cool Windows 7 Tools

1. Problem Steps Recorder

As the local PC guru you're probably very used to friends and family asking for help with their computer problems, yet having no idea how to clearly describe what's going on. It's frustrating, but Microsoft feels your pain, and Windows 7 will include an excellent new solution in the Problem Steps Recorder.

When any app starts misbehaving under Windows 7 then all your friends need do is click Start, type PSR and press Enter, then click Start Record. If they then work through whatever they're doing then the Problem Steps Recorder will record every click and keypress, take screen grabs, and package everything up into a single zipped MHTML file when they're finished, ready for emailing to you. It's quick, easy and effective, and will save you hours of troubleshooting time.

2. Burn images

Windows 7 finally introduces a feature that other operating systems have had for years - the ability to burn ISO images to CDs or DVDs. And it couldn't be much easier to use. Just double-click the ISO image, choose the drive with the blank disc, click Burn and watch as your disc is created.

3. Create and mount VHD files

Microsoft's Virtual PC creates its virtual machine hard drives in VHD files, and Windows 7 can now mount these directly so you can access them in the host system. Click Start, type diskmgmt.msc and press Enter, then click Action > Attach VHD and choose the file you'd like to mount. It will then appear as a virtual drive in Explorer and can be accessed, copied or written just like any other drive.

Click Action > Create VHD and you can now create a new virtual drive of your own (right-click it, select Initialise Disk, and after it's set up right-click the unallocated space and select New Simple Volume to set this up). Again, you'll be left with a virtual drive that behaves just like any other, where you can drag and drop files, install programs, test partitioning software or do whatever you like. But it's actually just this VHD file on your real hard drive which you can easily back up or share with others. Right-click the disk (that's the left-hand label that says "Disk 2" or whatever) and select Detach VHD to remove it.

The command line DISKPART utility has also been upgraded with tools to detach a VHD file, and an EXPAND command to increase a virtual disk's maximum size. Don't play around with this unless you know what you're doing, though - it's all too easy to trash your system.

4. Troubleshoot problems

If some part of Windows 7 is behaving strangely, and you don't know why, then click Control Panel > Find and fix problems (or 'Troubleshooting') to access the new troubleshooting packs. These are simple wizards that will resolve common problems, check your settings, clean up your system and more.

5. Startup repair

If you've downloaded Windows 7 (and even if you haven't) it's a good idea to create a system repair disc straight away in case you run into problems booting the OS later on. Click Start > Maintenance > Create a System Repair Disc, and let Windows 7 build a bootable emergency disc. If the worst does happen then it could be the only way to get your PC running again.

6. Take control

Tired of the kids installing dubious software or running applications you'd rather they left alone? AppLocker is a new Windows 7 feature that ensures users can only run the programs you specify. Don't worry, that's easier to set up than it sounds: you can create a rule to allow everything signed by a particular publisher, so choose Microsoft, say, and that one rule will let you run all signed Microsoft applications. Launch GPEDIT.MSC and go to Computer Configuration > Windows Settings > Security Settings > Application Control Policies > AppLocker to get a feel for how this works.

7. Calculate more

At first glance the Windows 7 calculator looks just like Vista's version, but explore the Mode menu and you'll see powerful new Statistics and Programmer views. And if you're clueless about bitwise manipulation, then try the Options menu instead. This offers many different unit conversions (length, weight, volume and more), date calculations (how many days between two dates?), and spreadsheet-type templates to help you calculate vehicle mileage, mortgage rates and more.

Don't take any Windows 7 applet at face value, then - there are some very powerful new features hidden in the background. Be sure to explore every option in all Windows applets to ensure you don't miss anything important.


CALCULATE MORE: The new Calculator is packed with useful features and functionality

8. Switch to a projector

Windows 7 now provides a standard way to switch your display from one monitor to another, or a projector - just press Win+P or run DisplaySwitch.exe and choose your preferred display. (This will have no effect if you've only one display connected.)

9. Get a power efficiency report

If you have a laptop, you can use the efficiency calculator to get Windows 7 to generate loads of useful information about its power consumption. Used in the right way, this can help you make huge gains in terms of battery life and performance. To do this you must open a command prompt as an administrator by typing 'cmd' in Start Search, and when the cmd icon appears, right-click it and choose Run as administrator.

Then at the command line, just type in 'powercfg -energy' (without quotes) and hit Return, and Windows 7 will scan your system looking for ways to improve power efficiency. It will then publish the results in an HTML file, usually in the System32 folder. Just follow the path it gives you to find your report.

10. Understanding System Restore

Using System Restore in previous versions of Windows has been something of a gamble. There's no way of telling which applications or drivers it might affect - you just have to try it and see.

Windows 7 is different. Right-click Computer, select Properties > System Protection > System Restore > Next, and choose the restore point you'd like to use. Click the new button to 'Scan for affected programs' and Windows will tell you which (if any) programs and drivers will be deleted or recovered by selecting this restore point. (Read our full Windows 7 System Restore tutorial.)

11. Set the time zone

System administrators will appreciate the new command line tzutil.exe utility, which lets you set a PC's time zone from scripts. If you wanted to set a PC to Greenwich Mean Time, for instance, you'd use the command

tzutil /s "gmt standard time"

The command "tzutil /g" displays the current time zone, "tzutil /l" lists all possible time zones, and "tzutil /?" displays details on how the command works.

12. Calibrate your screen

The colours you see on your screen will vary depending on your monitor, graphics cards settings, lighting and more, yet most people use the same default Windows colour profile. And that means a digital photo you think looks perfect might appear very poor to everybody else. Fortunately Windows 7 now provides a Display Colour Calibration Wizard that helps you properly set up your brightness, contrast and colour settings, and a ClearType tuner to ensure text is crisp and sharp. Click Start, type DCCW and press Enter to give it a try.

13. Clean up Live Essentials

Installing Windows Live Essentials will get you the new versions of Mail, Movie Maker, Photo Gallery and others - great. Unfortunately it also includes other components that may be unnecessary, but if you like to keep a clean system then these can be quickly removed.

If you left the default "Set your search provider" option selected during installation, for instance, Windows Live will install Choice Guard, a tool to set your browser home page and search engine, and prevent other programs from changing them. If this causes problems later, or you just decide you don't need it, then Choice Guard may be removed by clicking Start, typing msiexec /x and pressing [Enter].

Windows Live Essentials also adds an ActiveX Control to help upload your files to Windows Live SkyDrive, as well as the Windows Live Sign-in Assistant, which makes it easier to manage and switch between multiple Windows Live accounts. If you're sure you'll never need either then remove them with the Control Panel "Uninstall a Program" applet.

14. Add network support

By default Windows Live MovieMaker won't let you import files over a network, but a quick Registry tweak will change this. Run REGEDIT, browse to HKEY_CURRENT_USER\Software\Microsoft\Windows Live\Movie Maker, add a DWORD value called AllowNetworkFiles and set it to 1 to add network support.

15. Activate XP mode

If you've old but important software that no longer runs under Windows 7, then you could try using XP Mode, a virtual copy of XP that runs in a window on your Windows 7 desktop. But there's a big potential problem, as XP Mode only works with systems that have hardware virtualisation (AMD-V or Intel VT) built-in and turned on. If you've a compatible CPU then this may just be a matter of enabling the option in your BIOS set-up program, however some high profile brands, including Sony Vaio, disable the setting for "security reasons". And that blocks XP Mode from working, too.

One solution has emerged, but it's a little risky, as essentially you'll have to alter a byte in your laptop firmware and hope this doesn't have any unexpected side-effects. Gulp. If you're feeling brave then take a look at the Feature Enable Blog for the details, but don't blame us if it goes wrong.

A safer approach might be to use VirtualBox, a virtualisation tool that doesn't insist on hardware support, but then you will need to find a licensed copy of XP (or whatever other Windows version your software requires) for its virtual machine.

16. Enable virtual Wi-Fi

Windows 7 includes a little-known new feature called Virtual Wi-Fi, which effectively turns your PC or laptop into a software-based router. Any other Wi-Fi-enabled devices within range - a desktop, laptop, an iPod perhaps - will "see" you as a new network and, once logged on, immediately be able to share your internet connection.

This will only work if your wireless adapter driver supports it, though, and not all do. Check with your adapter manufacturer and make sure you've installed the very latest drivers to give you the best chance.

Once you have driver support then the easiest approach is to get a network tool that can set up virtual Wi-Fi for you. Virtual Router (below) is free, easy to use and should have you sharing your internet connection very quickly.


If you don't mind working with the command line, though, maybe setting up some batch files or scripts, then it's not that difficult to set this up manually. See Turn your Windows 7 laptop into a wireless hotspot for more.

17. Recover locked-up apps

If an application locks up under a previous version of Windows then there was nothing you could do about it. A new Windows 7 option, however, can not only explain the problem, but may get your program working again without any loss of data.

When the lockup occurs, click Start, type RESMON and click the RESMON.EXE link to launch the Resource Monitor.

Find your frozen process in the CPU pane (it should be highlighted in red), right-click it and select Analyze Wait Chain.

If you see at least two processes in the list, then the lowest, at the end of the tree, is the one holding up your program. If it's not a vital Windows component, or anything else critical, then save any work in other open applications, check the box next to this process, click End Process, and your locked-up program will often spring back to life.


18. Fault-Tolerant Help

Windows 7 includes a new feature called the Fault Tolerant Help (FTH), a clever technology that looks out for unstable processes, detects those that may be crashing due to memory issues, and applies several real-time fixes to try and help. If these work, that's fine - if not, the fixes will be undone and they won't be applied to that process again.

While this is very good in theory, it can leave you confused as some applications crash, then start working (sometimes) for no apparent reason. So if you'd like to check if the FTH is running on your PC, launch REGEDIT, and go to HKEY_LOCAL_MACHINE\Software\Microsoft\FTH - any program currently being protected by the FTH will be listed in the State key.

Experienced users may also try tweaking the FTH settings to catch more problems, and perhaps improve system stability. A post on Microsoft's Ask The Performance Team blog (bit.ly/d1JStu) explains what the various FTH Registry keys mean.

19. Automatically switch your default printer

Windows 7's location-aware printing allows the operating system to automatically switch your default printer as you move from one network to another.

To set this up, first click Start, type Devices, and click the Devices and Printers link.

Select a printer and click Manage Default Printers (this is only visible on a mobile device, like a laptop - you won't see it on a PC).

Choose the "Change my default printer when I change networks" option, select a network, the default printer you'd like to use, and click Add.

Repeat the process for other networks available, and pick a default printer for each one.

And now, as you connect to a new network, Windows 7 will check this list and set the default printer to the one that you've defined.

Friday, 21 October 2011

Download Inpaint with Free Serial Number to Remove Objects from Digital Photos

Do you have a digital photo that would look just right only if you could remove one or more “blemish” (whatever you may consider a blemish to be) from your composition? If so, try Inpaint!
Inpaint is an interesting photo editing application which enables you to remove undesirable objects, such as watermarks, extra power-line, people, date and time stamps, and other distracting objects, from your digital photos. You just need to outline the object to be removed with the provided selection tools and the program will analyze the selected area and attempt to fill it with pixels that match the surrounding area of the object to be removed. Objects on simple background such as plain backgrounds or simple patterns (sky, sand, concrete, grass etc.), can usually be removed with a single pass while more complex scenes may require multiple passes and selections achieve satisfactory results.
Inpaint
Top Reasons to use Inpaint:
  • Repair old photos
  • Remove watermarks
  • Remove unwanted objects
  • Digital Facial retouching
  • Remove date stamps
  • Easy to get started
How to download Inpaint with Serial Number for free?
Inpaint normally costs $39.99 for purchase and it is a “try-before-you-buy” product. You can download a fully-functional copy of the Inpaint and use it as long as you want. You will need to register Inpaint if you decide to save images. Good news is that now you can download the full version of Inpaint 2.4 with serial number for free of charge as part of PCPraxis / Software-butler promotion.
To grab your free copy:
1, Visit the Inpaint registration page to get your free personal license serial key of Inpaint 2.4 by submitting your details.
Inpaint registration
2, After submitting the form, a new webpage will open with your free serial number. It seems they are sending the same Serial Number to everyone: JXMI-IRBO-YTVC-CSXS-XUCS-OTNB-NOCQ-FDAJ
Inpaint Serial Number
3, Download the setup installer of Inpaint for Windows version 2.4: InpaintSetup_2_4.exe.
Inpaint v2.4 is compatible with Windows 2000 and higher platform. Click here to watch video guide: How to remove unwanted objects from image/photo.

Thursday, 20 October 2011

Tweak And Customize Windows 8 UI With Metro UI Tweaker for Windows 8

The recently released Windows 8 Developer Preview build comes with lots of new features and enhancements, and among them are the new Metro interface, ribbon toolbar and redesigned Start menu. However, some Windows 8 users have failed to fall in love with the new Metro interface and ribbon toolbars, and are looking for the ways to disable them. Earlier, we have covered a freeware tool called Metro Controller to enable and disable the entire Metro UI and/or Windows Explorer Ribbon in Windows 8. Metro UI Tweaker for Windows 8 is another free tweaking utility that enables you to customise Windows 8 to suit your liking.
Metro UI Tweaker is a tiny freeware utility to enable/disable Windows 8 Metro features with a mouse click. Using this tool, you can partially or completely disable the Windows Metro UI, as well as add Log Off, Switch user, Lock, Sleep, Restart and Shutdown and applications/files shortcuts to the Metro UI Start Menu Screen.
Metro UI Tweaker for Windows 8
Metro UI Tweaker for Windows 8 allows you enable or disable the following Metro features:
  • Disable Metro Start Menu: Disables only Metro Start Menu Screen. This function requires editing a System File. It does not remove the file.
  • Disable Metro Ribbon: Disables only the Metro Ribbon UI. This function requires Taking Ownership of a System File. It does not remove this file.
  • Disable Metro Start Menu and Ribbon: Disables the Metro Start Menu UI, Ribbon UI, Metro Task Manager UI and the Lock Screen.
  • Enable Metro Start Menu and Ribbon: Re-enables all available Metro UI options.
In addition, you can also make a number of additions to the Start menu to provide access to the options and programs you use most often:
  • Add Power Options to the Metro Start Menu Screen: Logoff, Switch User, Lock, Sleep, Restart and Shutdown
  • Add any Application/File to the Metro UI Start Menu Screen: Some Applications/Files may not be available to you to add to the Metro Start Menu Screen. This program allows you to add those Applications/Files which would otherwise be unavailable.
Of course, you need to restart your Windows 8 to apply these settings.
Download Metro UI Tweaker for Windows 8 from softpedia
Metro UI Tweaker for Windows 8 works on Windows 8 Developer Preview (both 32 & 64-bit).
On first run the program will generate a folder in your Windows Directory labeled Metro UI Tools. This folder is to keep your Power Option apps in places without worrying about them having to be moved. Once generated and the files are unpacked from the program, do not remove the folder or the Power Apps from this folder as these options will no longer be available and may generate errors.

Sunday, 2 October 2011

LG secret codes

Qualified for the mobile phone, secret code is required in the know, and I believe that engineers are mobile secret code, but not necessarily for the user know that the mobile phone that has a secret code, below is a secret code LG mobile phone

LG
2945#*# - service menu (code reset)(W3000 G5300 C1200 G7100...)
2945#(*)- hold (LG 500,600)
B1200 *+pwr, 6,6,8 Service Menu
B1300 *+pwr, 1,5,9 Service Menu

Security Removing Code For Lg 8110,8120.
47328545454#
Or
277634#*#
LG
2945#*# - service menu (code reset)(W3000 G5300 C1200 G7100...)
2945#(*)- hold (LG 500,600)
B1200 *+pwr, 6,6,8 Service Menu
B1300 *+pwr, 1,5,9 Service Menu

Security Removing Code For Lg 8110,8120.
47328545454#
Or
277634#*#

U8180 old ...............49857465454#
U8180 new .............492662464663#
U8330 ...................637664#*#
U8360 ...................*6*41*12##
U8380 ...................525252#*#


ALL LG 2G : 2945#*#
8110 & 8120 : 277634#*#
U8130 & U8138 : 47328545454#
8180 old sw : 49857465454#
8180 new sw : 492662464663#
8330 : 637664#*#
8360 : *6*41*12##
8380 : 525252#*#

LG 8550 885508428679#*#
Phone
Service Menu Code

8110 277634#*#

8120 277634#*#

8130 47328545454#

8138 47328545454#

8180 v10A 49857465454#

8180 v11A 492662464663#

8330 637664#*#

8360 *6*41*12##

8380 525252#*#

8550 885508428679#*#

Phone
Unlock Menu Code

Older phones 2945#*88110#


U880
was told that unlocking code for the phone is "0794070061"
and method is to enter 142358#*#
but when i enter above code instead of asking for nck code it restarts(phone is temporary unlocked with sim inside).
Plz help how to unlock it permanently


After complete Flashing just Enter 142358#*#

hopefully useful to you, although still short of many but I will try to provide the best for you

Friday, 30 September 2011

ALL SAMSUNG SECRET CODES

This post is an collection of numerous secret codes for samsung mobiles.they perform a wide variety of functions like imei checking,software version etc.

* *#06# Shows IMEI number of your mobile.
* *#9999# Show software version of mobile.
* *#0001# Display RS232 serial communication parameter setup
* *#8999*228# Display battery capacity and temperature / voltage
* *#8999*523# Adjust display contrast

* *#8999*636# Display storage capacity
* *#8999*778# Display SIM card information
* *#8999*324# The network checkout (engineering model)
* *#8999*289# Ringtone test
* *#8999*364# Display Watchdog state
* *#8999*427# WATCHDOG signal route setup
* *#8999*842# Vibrate test
* *#8999*782# Show date and alarm clock
* *#8999*246# Show the memory capacity
* *#8999*786# The display during warning
* *#8999*837# Samsung hardware version
* *#8999*377# Software error LOG (wrong display of EEPROM)
* *#8999*638# Show network information

hope these samsung secret codes are useful to you.if you know any other tricks pls post a comment to let others know.

15 General Tips and Tricks for Nokia Users

Tips 1 : Do u know how to use the edit button (abc or pencil button)?

Heres how... In the inbox for example; u wanna delete multiple sms, simply hold the edit button, scroll down, and then, press c to delete the marked sms. The edit button can also b used to copy and past text in sms, simply hold it and scroll across, choose copy. Pretty good for placing song names in ngages


Tip 2 : Shit happens, on a smartphone, its inevitable u do something wrong, and tis calls for a format of fone. To format the fone, press *#7370#, then enter the lock code, which is the sec code of the fone. NOTE: batt must b full, else if format is disrupted by low batt, consequences will b disatrous.I heard the code *#7780# works too, pretty much the same i tink.

for 6600 users, to format the fone, theres an alternative way. Press and hold <3>, <*> and Call (Send) buttons, then power on fone, keep holding on the 3 buttons, till u come to a format screen. This method ONLY works on 6600, and need not enter the sec code. BUT sec code would be reset to default 12345.

Tip 3 : TO NGAGE USERS; Did u know u can install .sis files simply using the cable given? Juz plug it in, place the .sis file anywhere on e: (the mmc), not in any folders, root of e:, disconnect, then look for it in manager.


Tip 4: Save on battery and system memory being used by regulary checking the task manager which can be accessed by holding down the menu button!!

Tip 4a: Set the screen saver to a short time out period to prolong battery life.
Tip 4b: Avoid restarting the phone, or repeatedly turning it on and off. This helps increase battery life.

Tip 5: Type *#06# to display your IMEI serial number, very valuable for the unlocking your phone to other sim cards

Tip 6: Type *#0000# to view which firmware version you are running


Tip 7: If you would like to avoid being "blue jacked", keep bluetooth turned off, or set your phone's visibility to hidden.

Tip 8: Don't want to carry a watch and a phone? Set the screen saver to show date and time, then you can ditch the watch.

Tip 9: Save memory when installing apps, by installing over bluetooth. This can be done using the nokia phone suite and a bluetooth serial connection. Only works with .SIS files, so java still has to be sent to the phone, but will save space when using .SIS files.


Tip 10: Operator logos
Use a filemanager like FExplorer or SeleQ to add the folders: "c:/system/Apps/phone/oplogo". Add a .bmp picture to folder "oplogo" and restart your phone! The .bmp picture size needs to be: 97 x 25 pixels

Tip 11: Check if the recepients phone is on
Delivery reports

or

Type *0# your message in the message composer window space then write your message, the recipient will not see the star zero hash bit - just the message When they read it it will relay a message back to your fone showing the time they recieved it. (haven't yet tried it myself though)

Tip 12: BlueJacking

First up, you need to know what Bluetooth is. There are lots of types of modern devices that incorporate Bluetooth as one of their many features. PDAs, mobile phones and laptops are a few of these modern devices. Bluetooth means that Bluetooth enabled devices can send things like phonebook/address book contacts, pictures & notes to other Bluetooth enabled devices wirelessly over a range of about 10 metres. So, we've got past the boring part. Now, using a phone with Bluetooth, you can create a phonebook contact and write a message, eg. 'Hello, you've been bluejacked', in the 'Name' field. Then you can search for other phones with Bluetooth and send that phonebook contact to them. On their phone, a message will popup saying "'Hello, you've been bluejacked' has just been received by Bluetooth" or something along those lines. For most 'victims' they will have no idea as to how the message appeared on their phone.


Tip 13: While you are viewing a picture in your phone's gallery, press one of these shortcut keys (definitely works on 6600, not sure about other symbians)
1 - turn image anticlockwise
3 - turn image clockwise
* - toggle on/off of full screen
5 - zoom in
0 - zoom out

Tips 14 :u can select all files in a folder by selecting THE folder and copy it then paste it somewhere. However u need to make a new directory. Fexplorer wun let u copy that folder together. Well seleQ can mark files to copy but it really takes time!

Tips 15 :A soft and Hard reset
A Soft-reset - the process of resetting all the settings of the phone to the factory default! No applications are deleted! A Hard-reset is like formatting a drive! It does format the memory. Everything that has been installed after the first use of the phone is deleted! It will recover the memory of the phone to the state you purchased it! It is done by inputing the following code: *#7370# NOTE: The battery must be full or the charger has to be connected to the phone so that it does not run out of power and make the phone unusable.

How to Create Your Own Customized Run Commands

The Run command on Microsoft Windows operating system allows you to directly open an application or document with just a single command instead of navigating to it’s location and double-clicking the executable icon. However, it only works for some of the inbuilt Windows programs such as Command prompt (cmd), Calculator (calc) etc. So, have you ever wondered how to create your own customized Run commands for accessing your favorite programs, files and folders? Well, read on to find out the answer.

Creating the Customized Run Command

Let me take up an example of how to create a customized run command for opening the Internet explorer. Once you create this command, you should be able to open the Internet explorer just by typing “ie” (without quotes) in the Run dialog box. Here is how you can do that.
1. Right click on your Desktop and select New -> Shortcut.
2. You will see a “Create Shortcut” Dialog box as shown below

3. Click on “Browse”, navigate to: Program Files -> Internet Explorer from your Root drive (usually C:\) and select “iexplore” as shown in the above figure and click on “OK”.
4. Now click on “Next” and type any name for your shortcut. You can choose any name as per your choice; this will be your customized “Run command”. In this case I name my shortcut as “ie”. Click on “Finish”.
5. You will see a shortcut named “ie” on your desktop. All you need to do is just copy this shortcut and paste it in your Windows folder (usually “C:/Windows”). Once you have copied the shortcut onto your Windows folder, you can delete the one on your Desktop.
6. That’s it! From now on, just open the Run dialog box, type ie and hit Enter to open the Internet Explorer.
In this way you can create customized Run commands for any program of your choice. Say “ff” for Firefox, “ym” for Yahoo messenger, “wmp” for Windows media player and so on.
To do this, when you click on “Browse” in the Step-3, just select the target program’s main executable (.exe) file which will usually be located in the C:\Program Files folder. Give a simple and short name for this shortcut as per your choice and copy the shortcut file onto the Windows folder as usual. Now just type this short name in the Run dialog box to open the program.

Increase Font Size On Nokia E50

You’ll need a memory card and a file manager (e.g. Y-Browser or ActiveFile).


1. Open your file manager and navigate to Z:\resource\Fonts

2. Check the names of the files (these are the fonts that are actually used); they have extension .ttf and most likely they are nosnr60.ttf, nssb60.ttf, nstsb60.ttf and S60ZDIGI.ttf; write them down, you’ll need them later

3. On your memory card create a folder called resource and inside it a folder called Fonts

4. Copy the new fonts to the Fonts folder on your memory card (there are numerous fonts available on the internet for free; try a few of them, experiment and see which fits the best)

5. Rename them in the following order: – nosnr60.ttf regular (normal) font – nssb60.ttf bold font – nstsb60.ttf font for titles

Note: if your font files have different names rename them accordingly. Font names on your memory card must match those on phone memory in Z:\resource\Fonts.

6. Reboot the phone

If you want to switch back to the default font simply erase the whole resource folder from your memory card. If you take your memory card out of the phone the default font will be used.


A Software can also increases font sizes use it for any s60...

Software: Font Magnifier
avialable at: http://shop.psiloc.com

back to top
Twitter Delicious Facebook Digg Stumbleupon Favorites More

 
Design by Free WordPress Themes | Bloggerized by Lasantha - Premium Blogger Themes | Affiliate Network Reviews